Scheduled Distributions
Every AI Pricing Model is already running a traffic distribution. A Scheduled Distribution is a second distribution with a start and an end: while its window is open it takes over the model's traffic completely, and when the window closes the model returns to its always-on split on its own.
Reach for one when a creative needs the traffic for a fixed period and then needs to get out of the way. A holiday offer that runs from December 20 to December 27, a launch-week price, a Black Friday paywall, a regional sale. You set the window once, and there is nothing to switch back afterwards.
Schedules live on the model's Traffic Control tab. Click AI Pricing Models in the left sidebar, open the model, select the Traffic Control tab, and scroll to Scheduled Distributions. For how the always-on distribution works, see Traffic Control.
Before you start: a schedule targets a placement, never a paywall ID, so the seasonal creative needs to sit behind a placement of its own before you can schedule it. Build the paywall, put it behind a placement, and confirm that placement serves it. See Create Placements.
Create a scheduled distribution
-
Open the model's Traffic Control tab, scroll to Scheduled Distributions, and click Add Schedule.
-
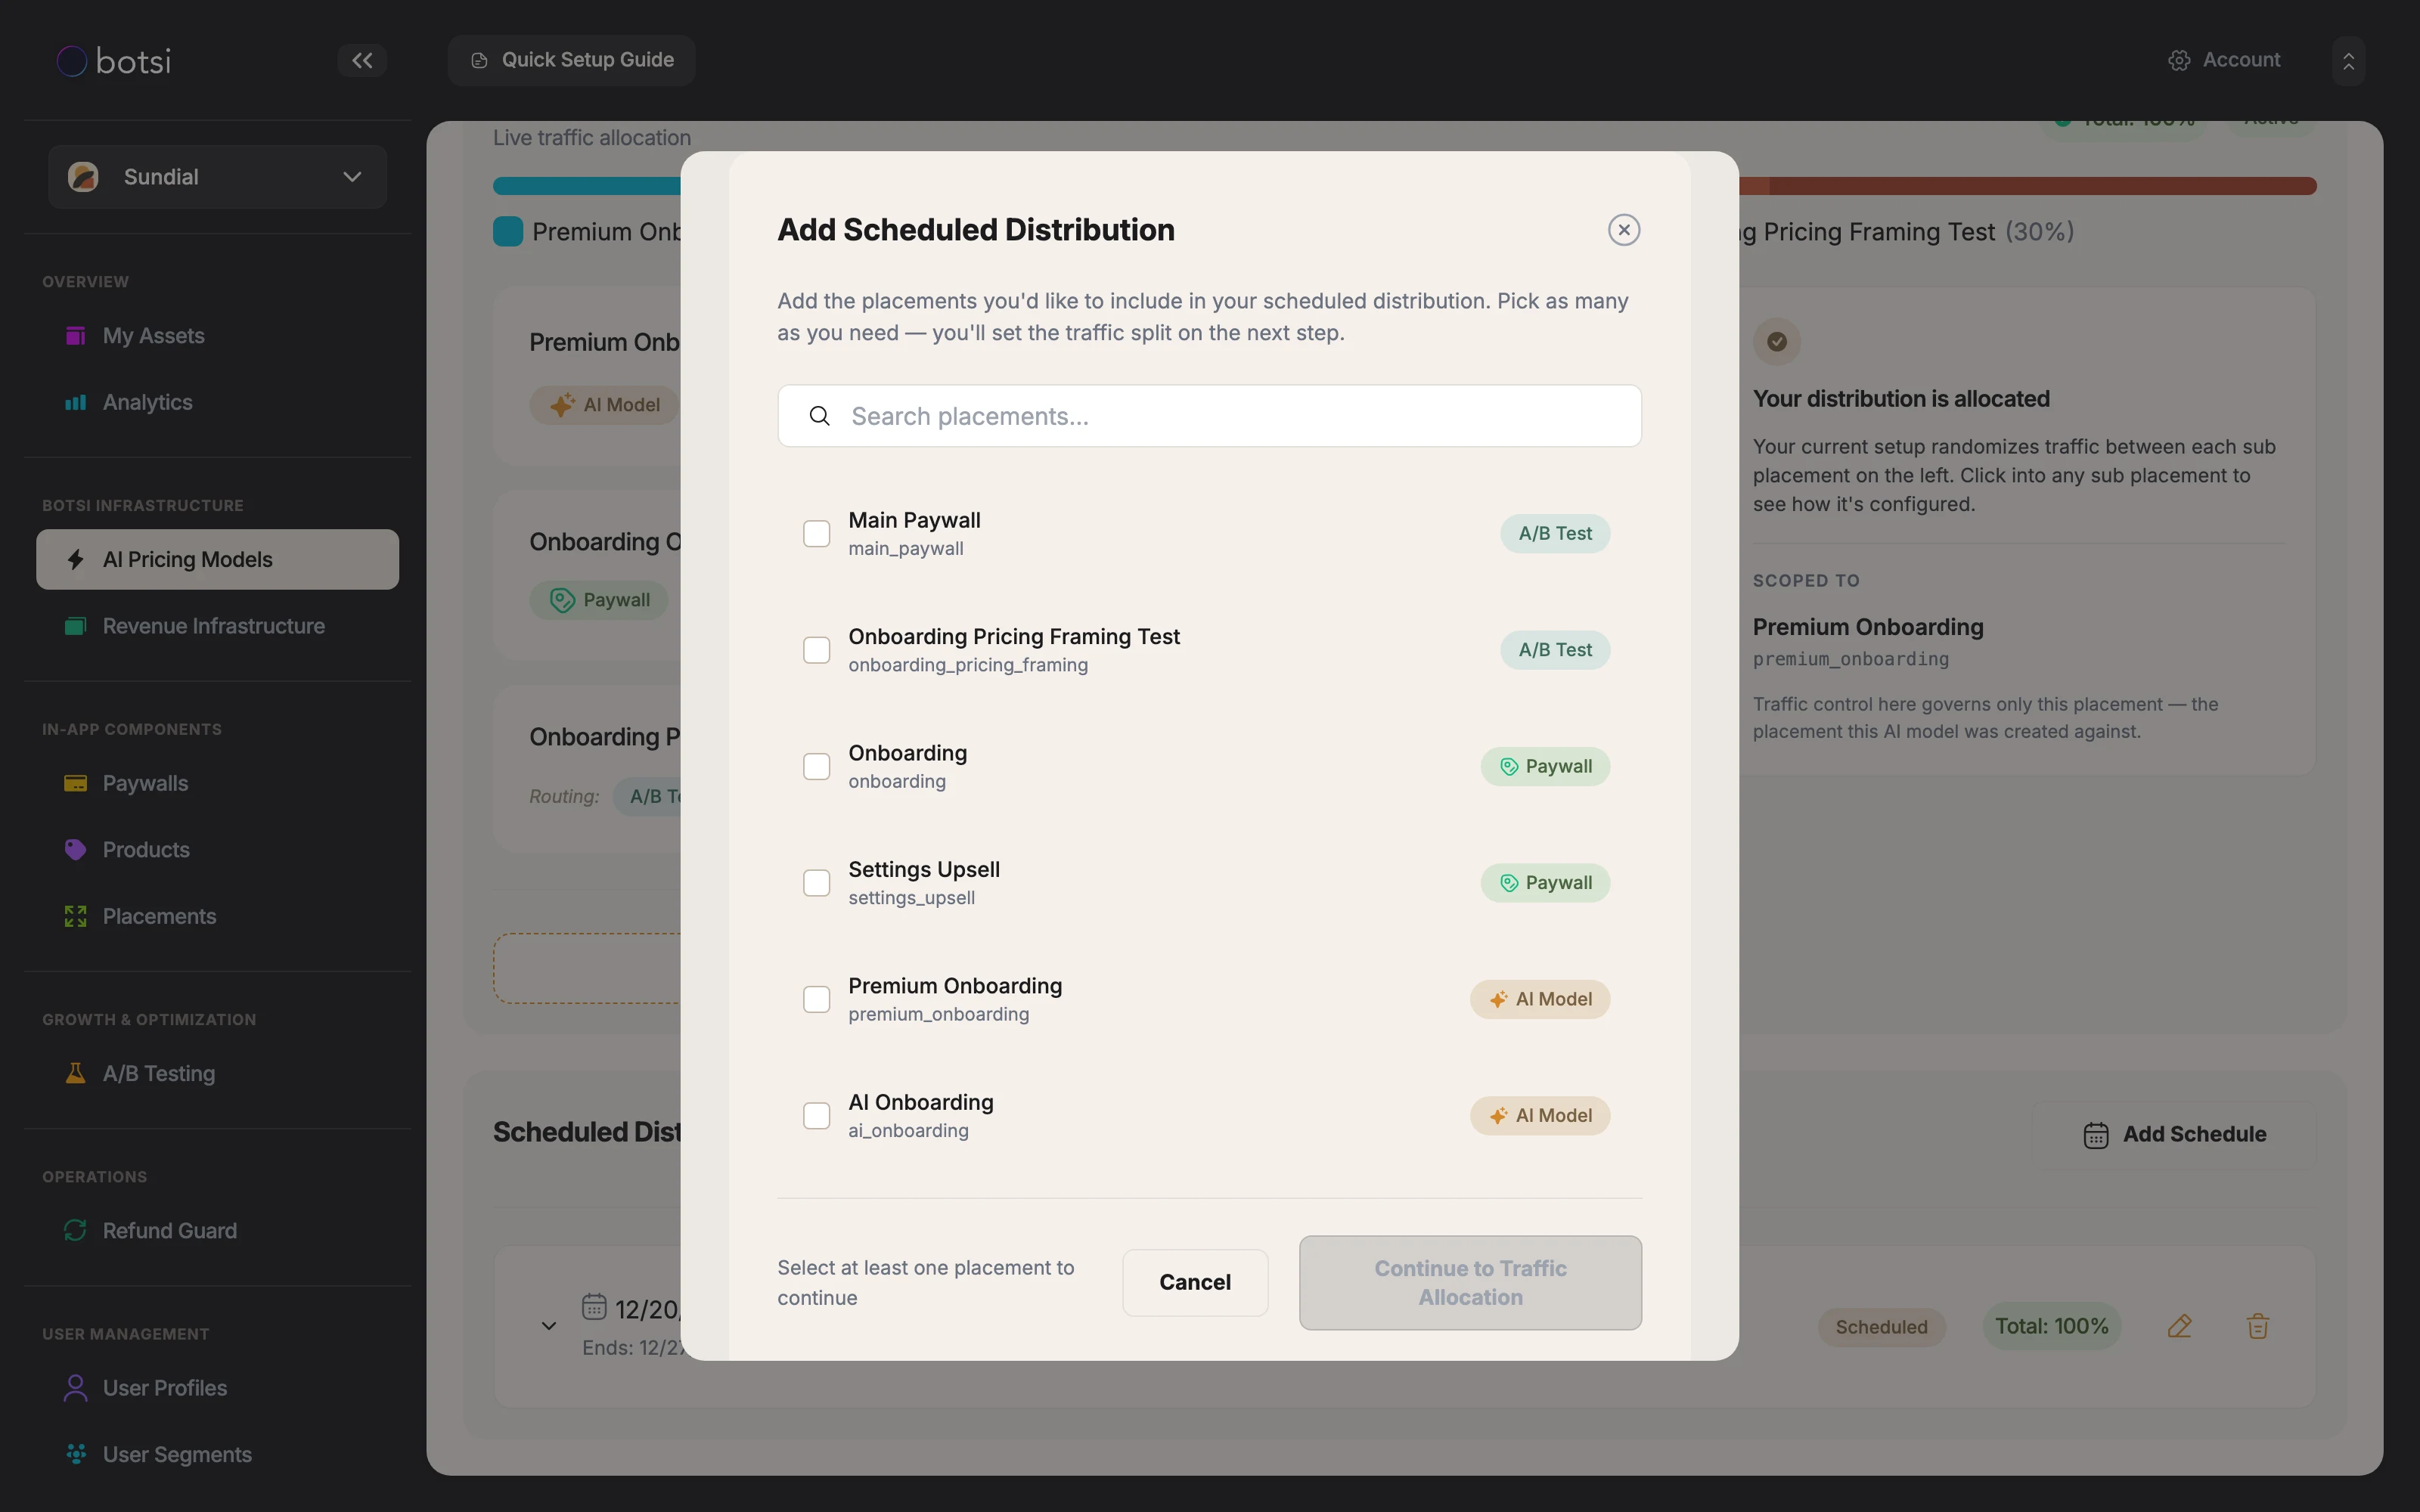
In step 1 of the Add Scheduled Distribution dialog, search for the placement that serves the seasonal creative and select it. Each placement in the list carries a chip for every routing its audiences use, AI Model, A/B Test or Paywall, so you can confirm you picked the right one. Click Continue to Traffic Allocation.
-
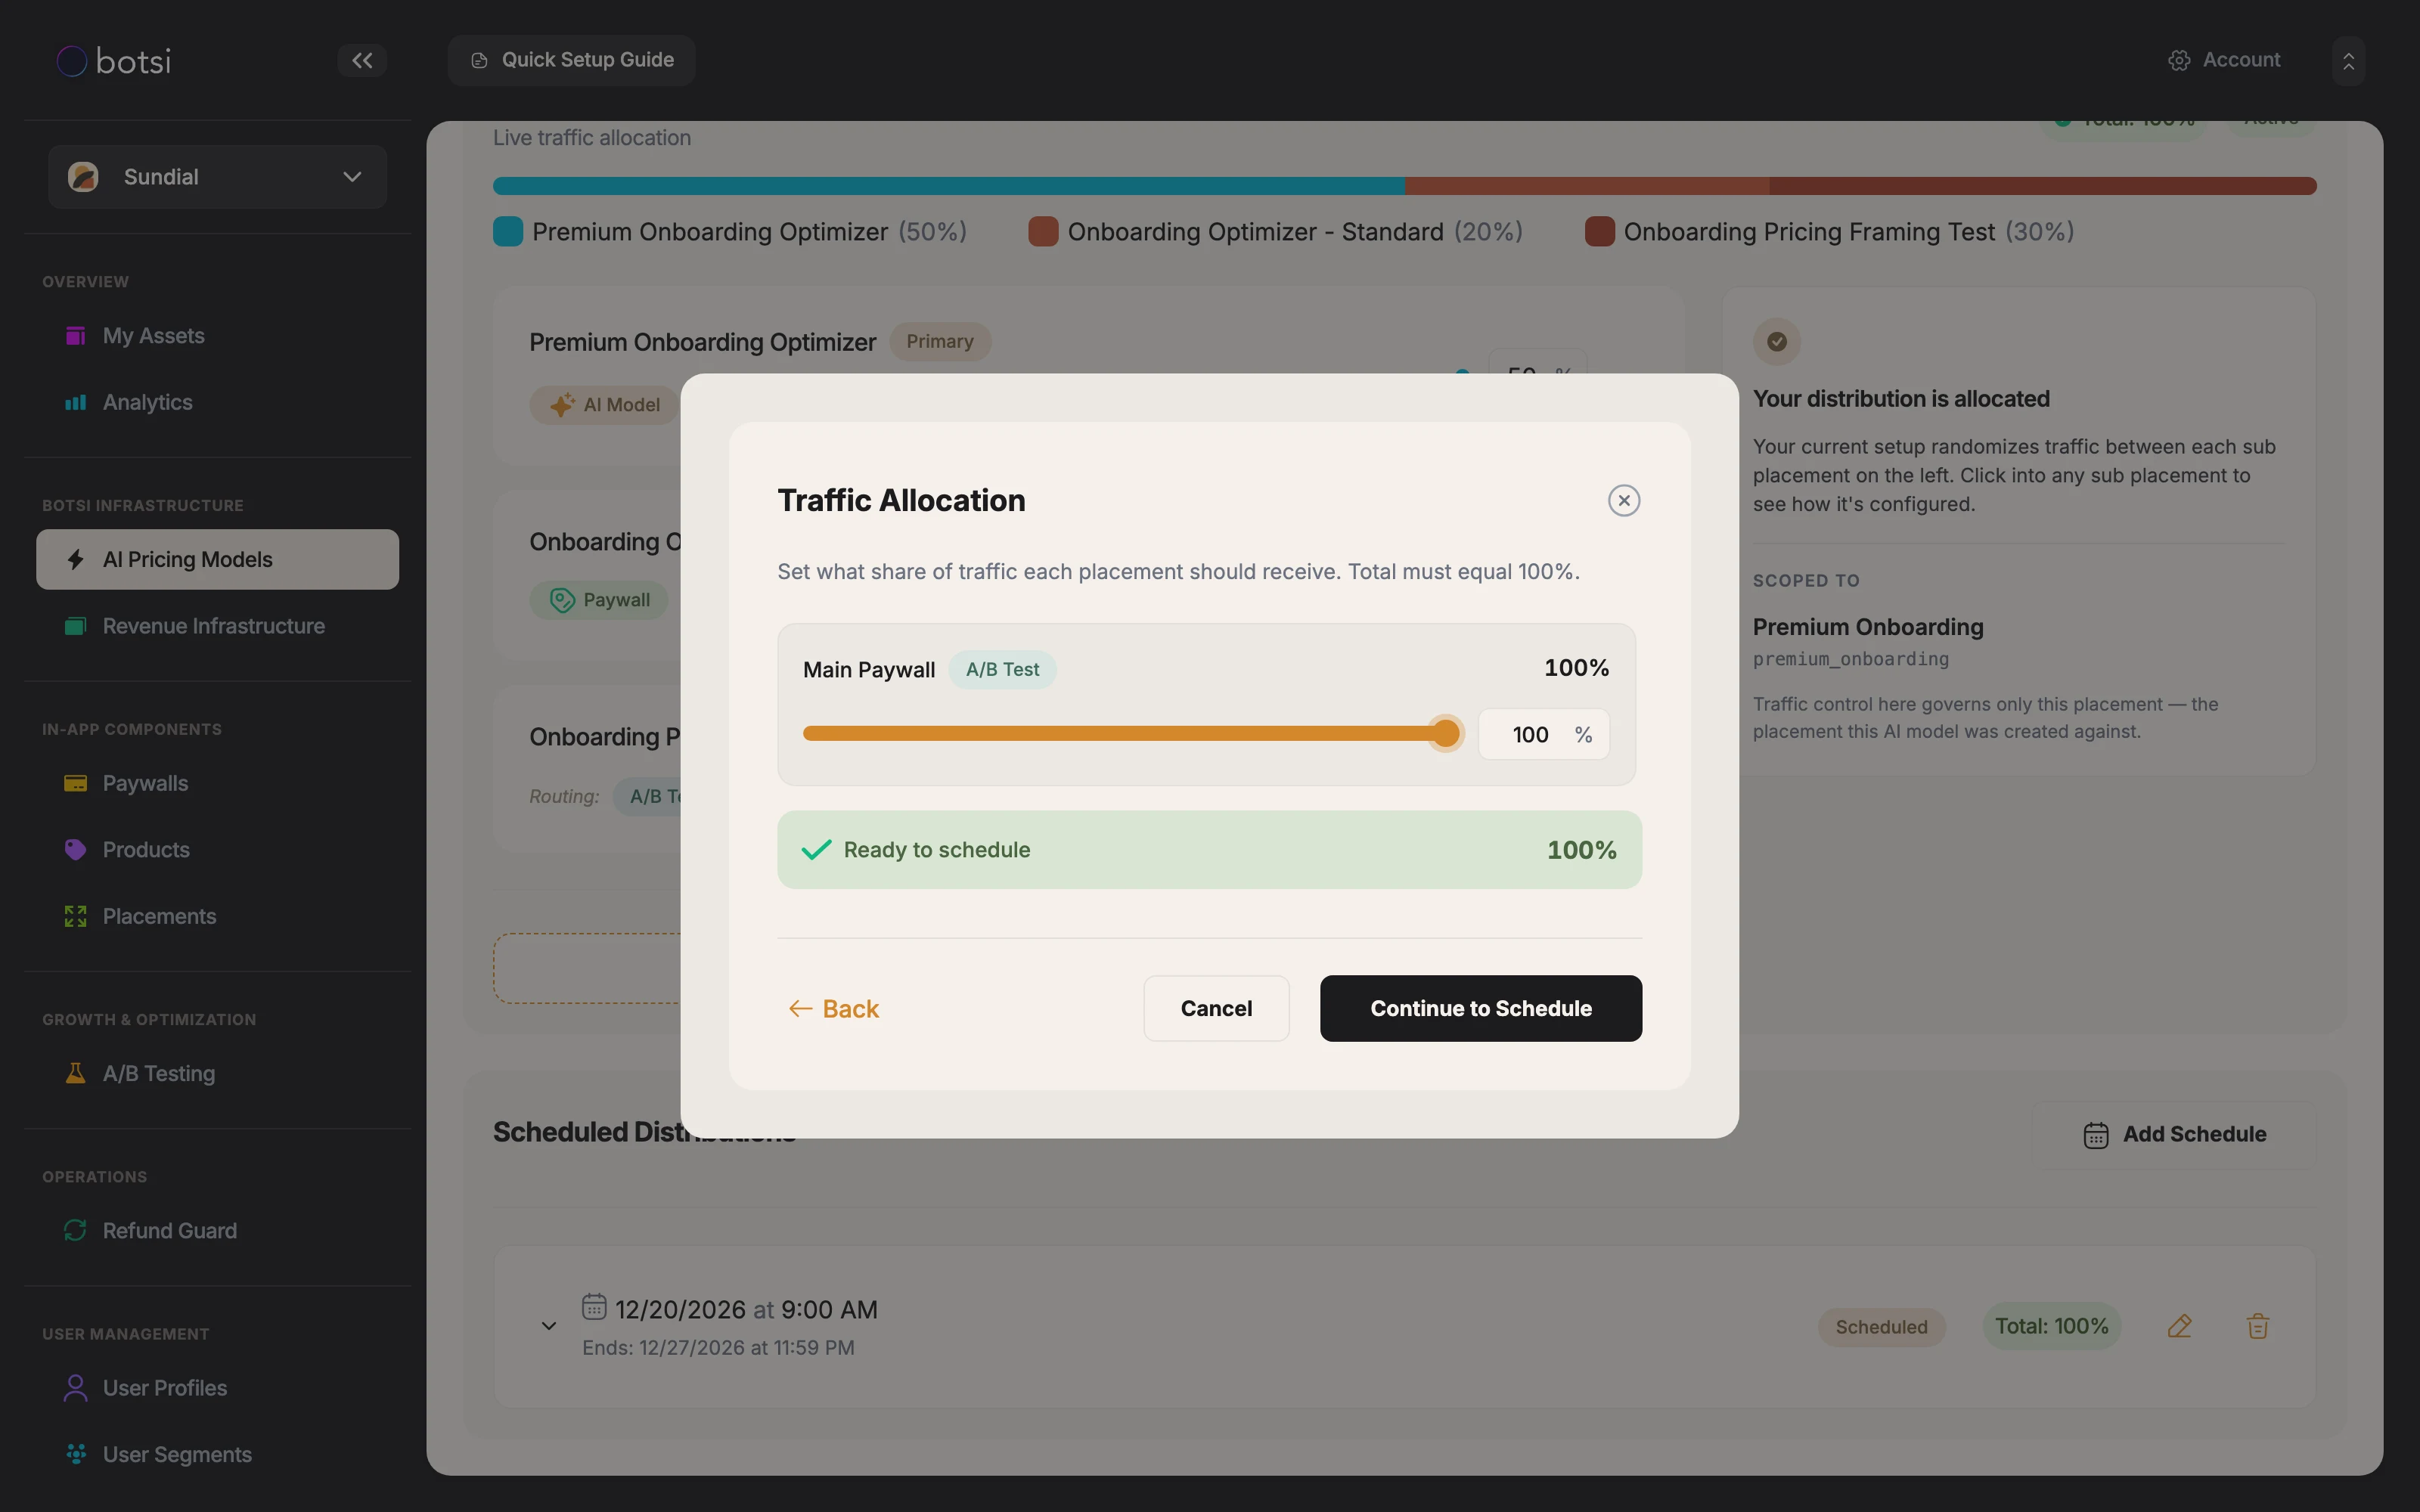
In step 2, Traffic Allocation, set the placement to 100 with the slider or the number field. The status bar reads Total must equal 100% until the weights add up, then switches to Ready to schedule. Click Continue to Schedule.
-
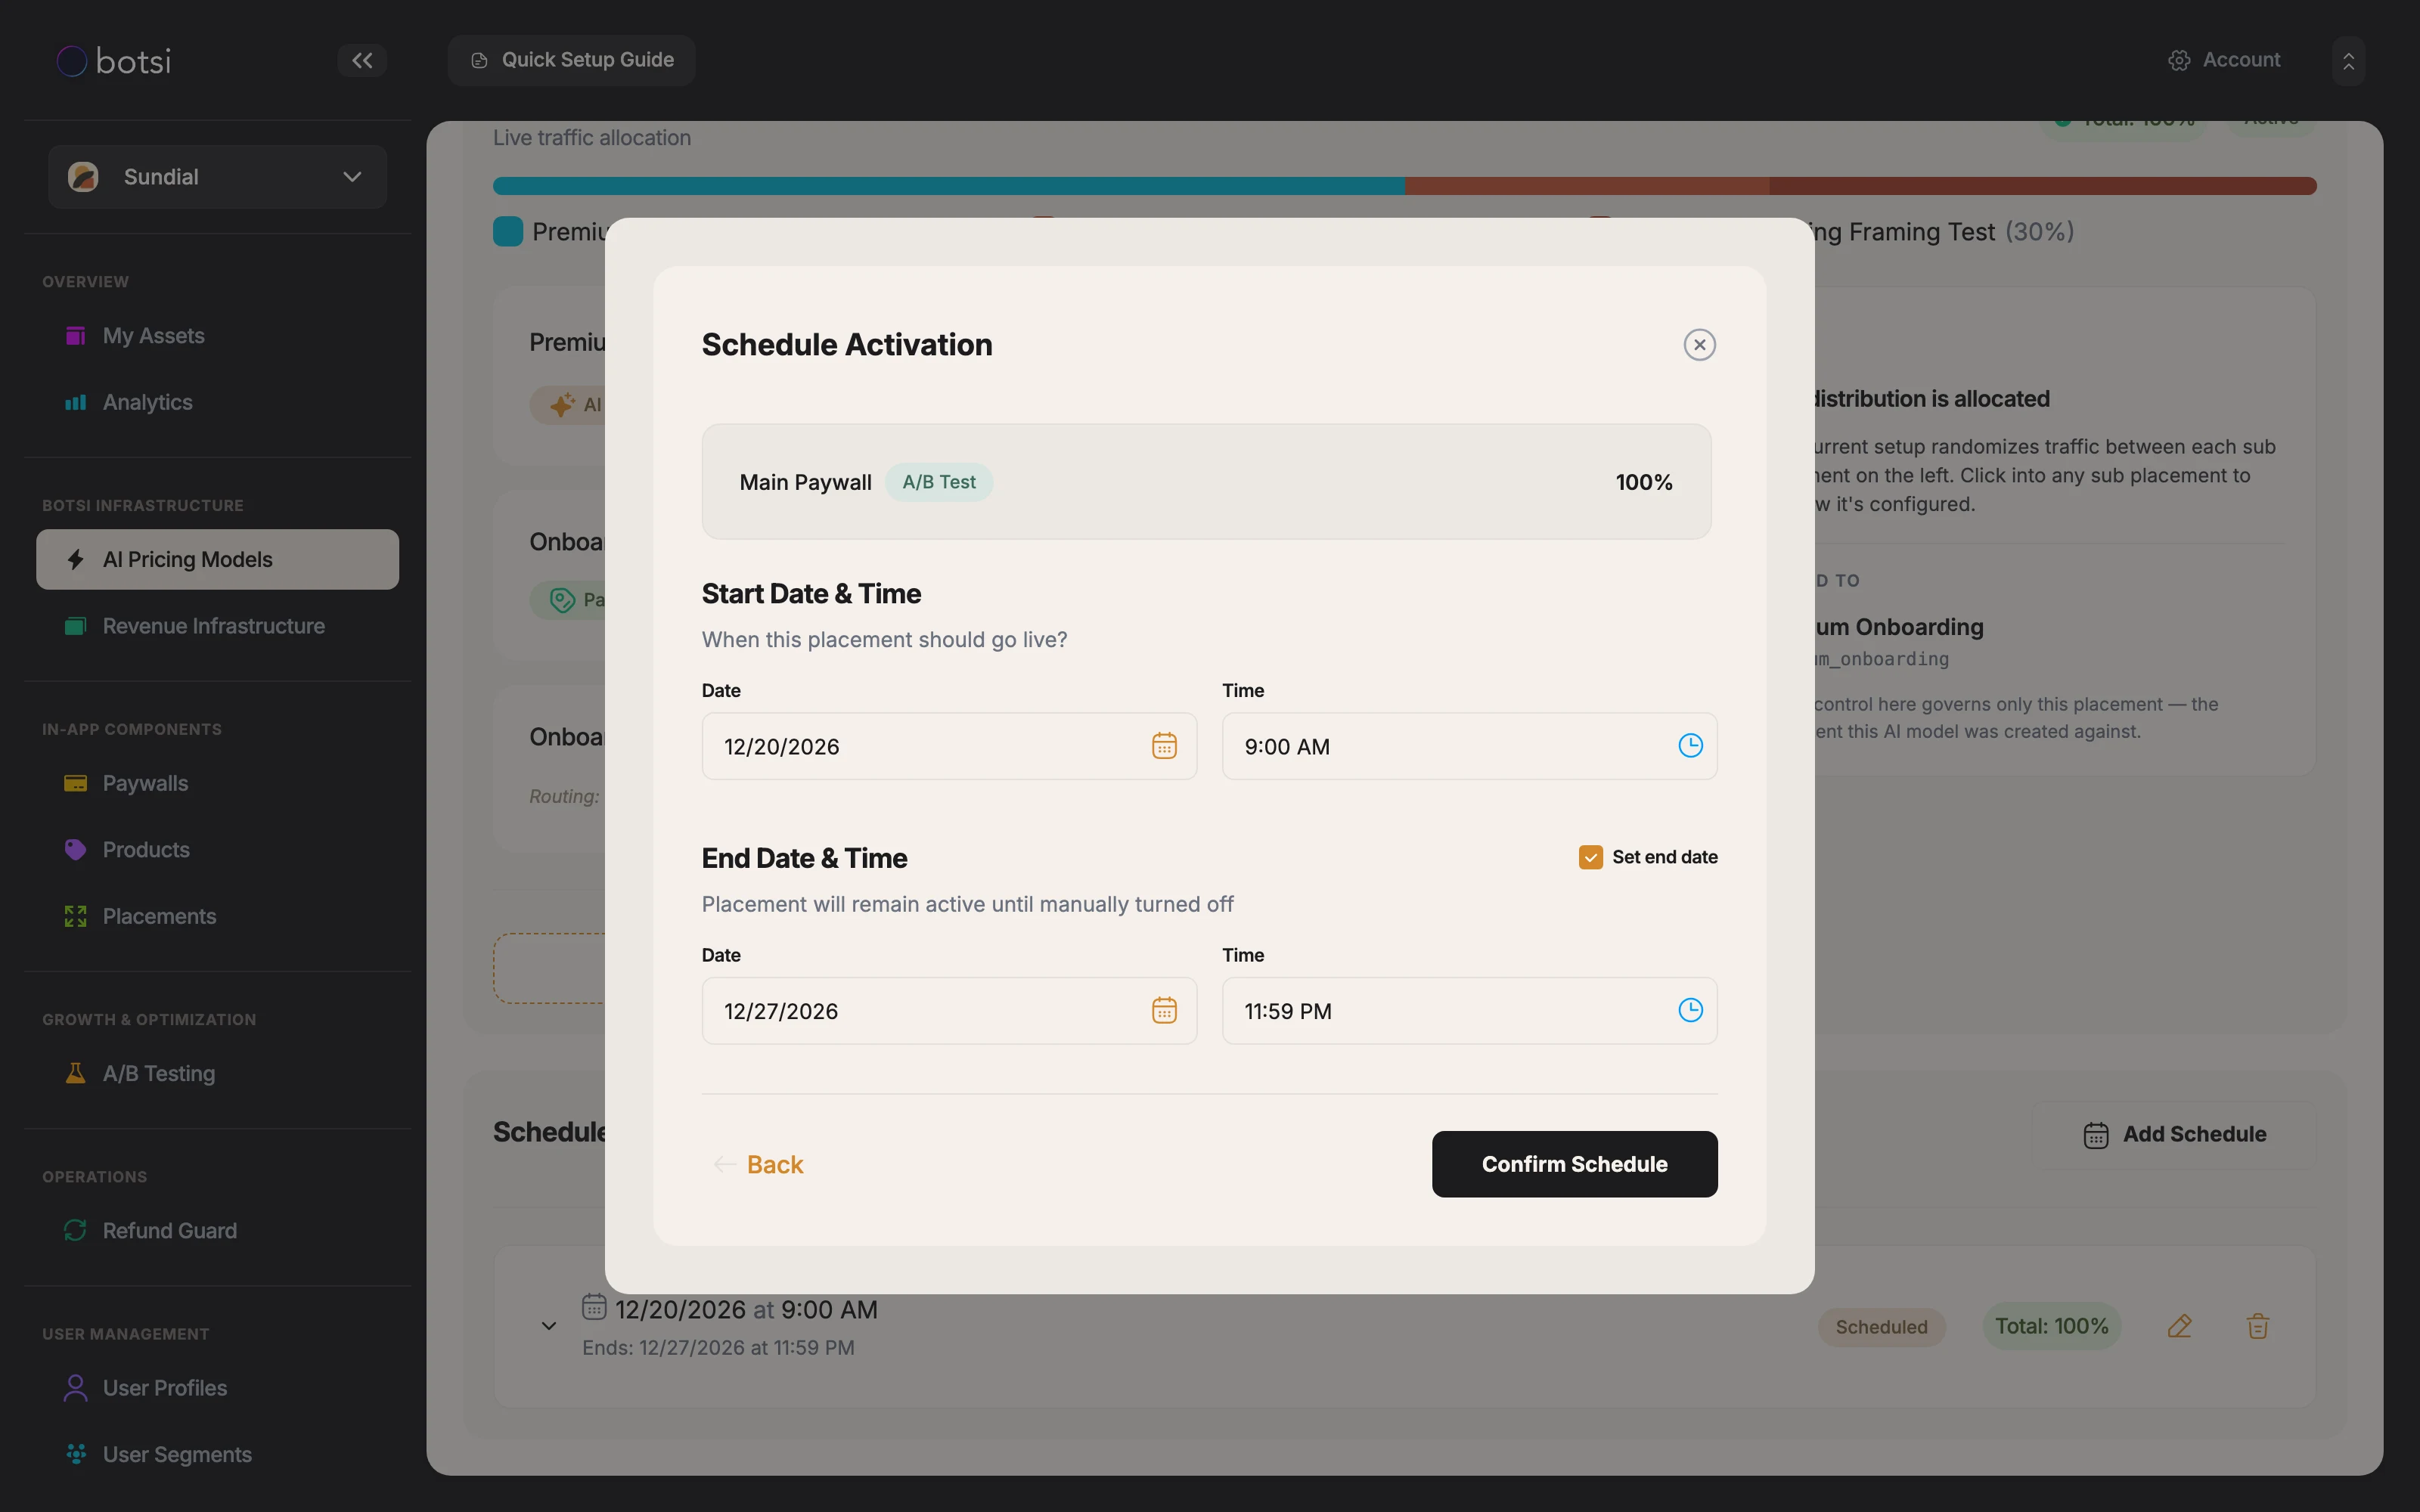
In step 3, Schedule Activation, set the Start Date & Time, tick Set end date, then set the End Date & Time. Click Confirm Schedule.
-
The schedule appears in the Scheduled Distributions list with its window, a Scheduled badge, and its own Total: 100%. Confirming saves it, so there is no separate Save Changes step.
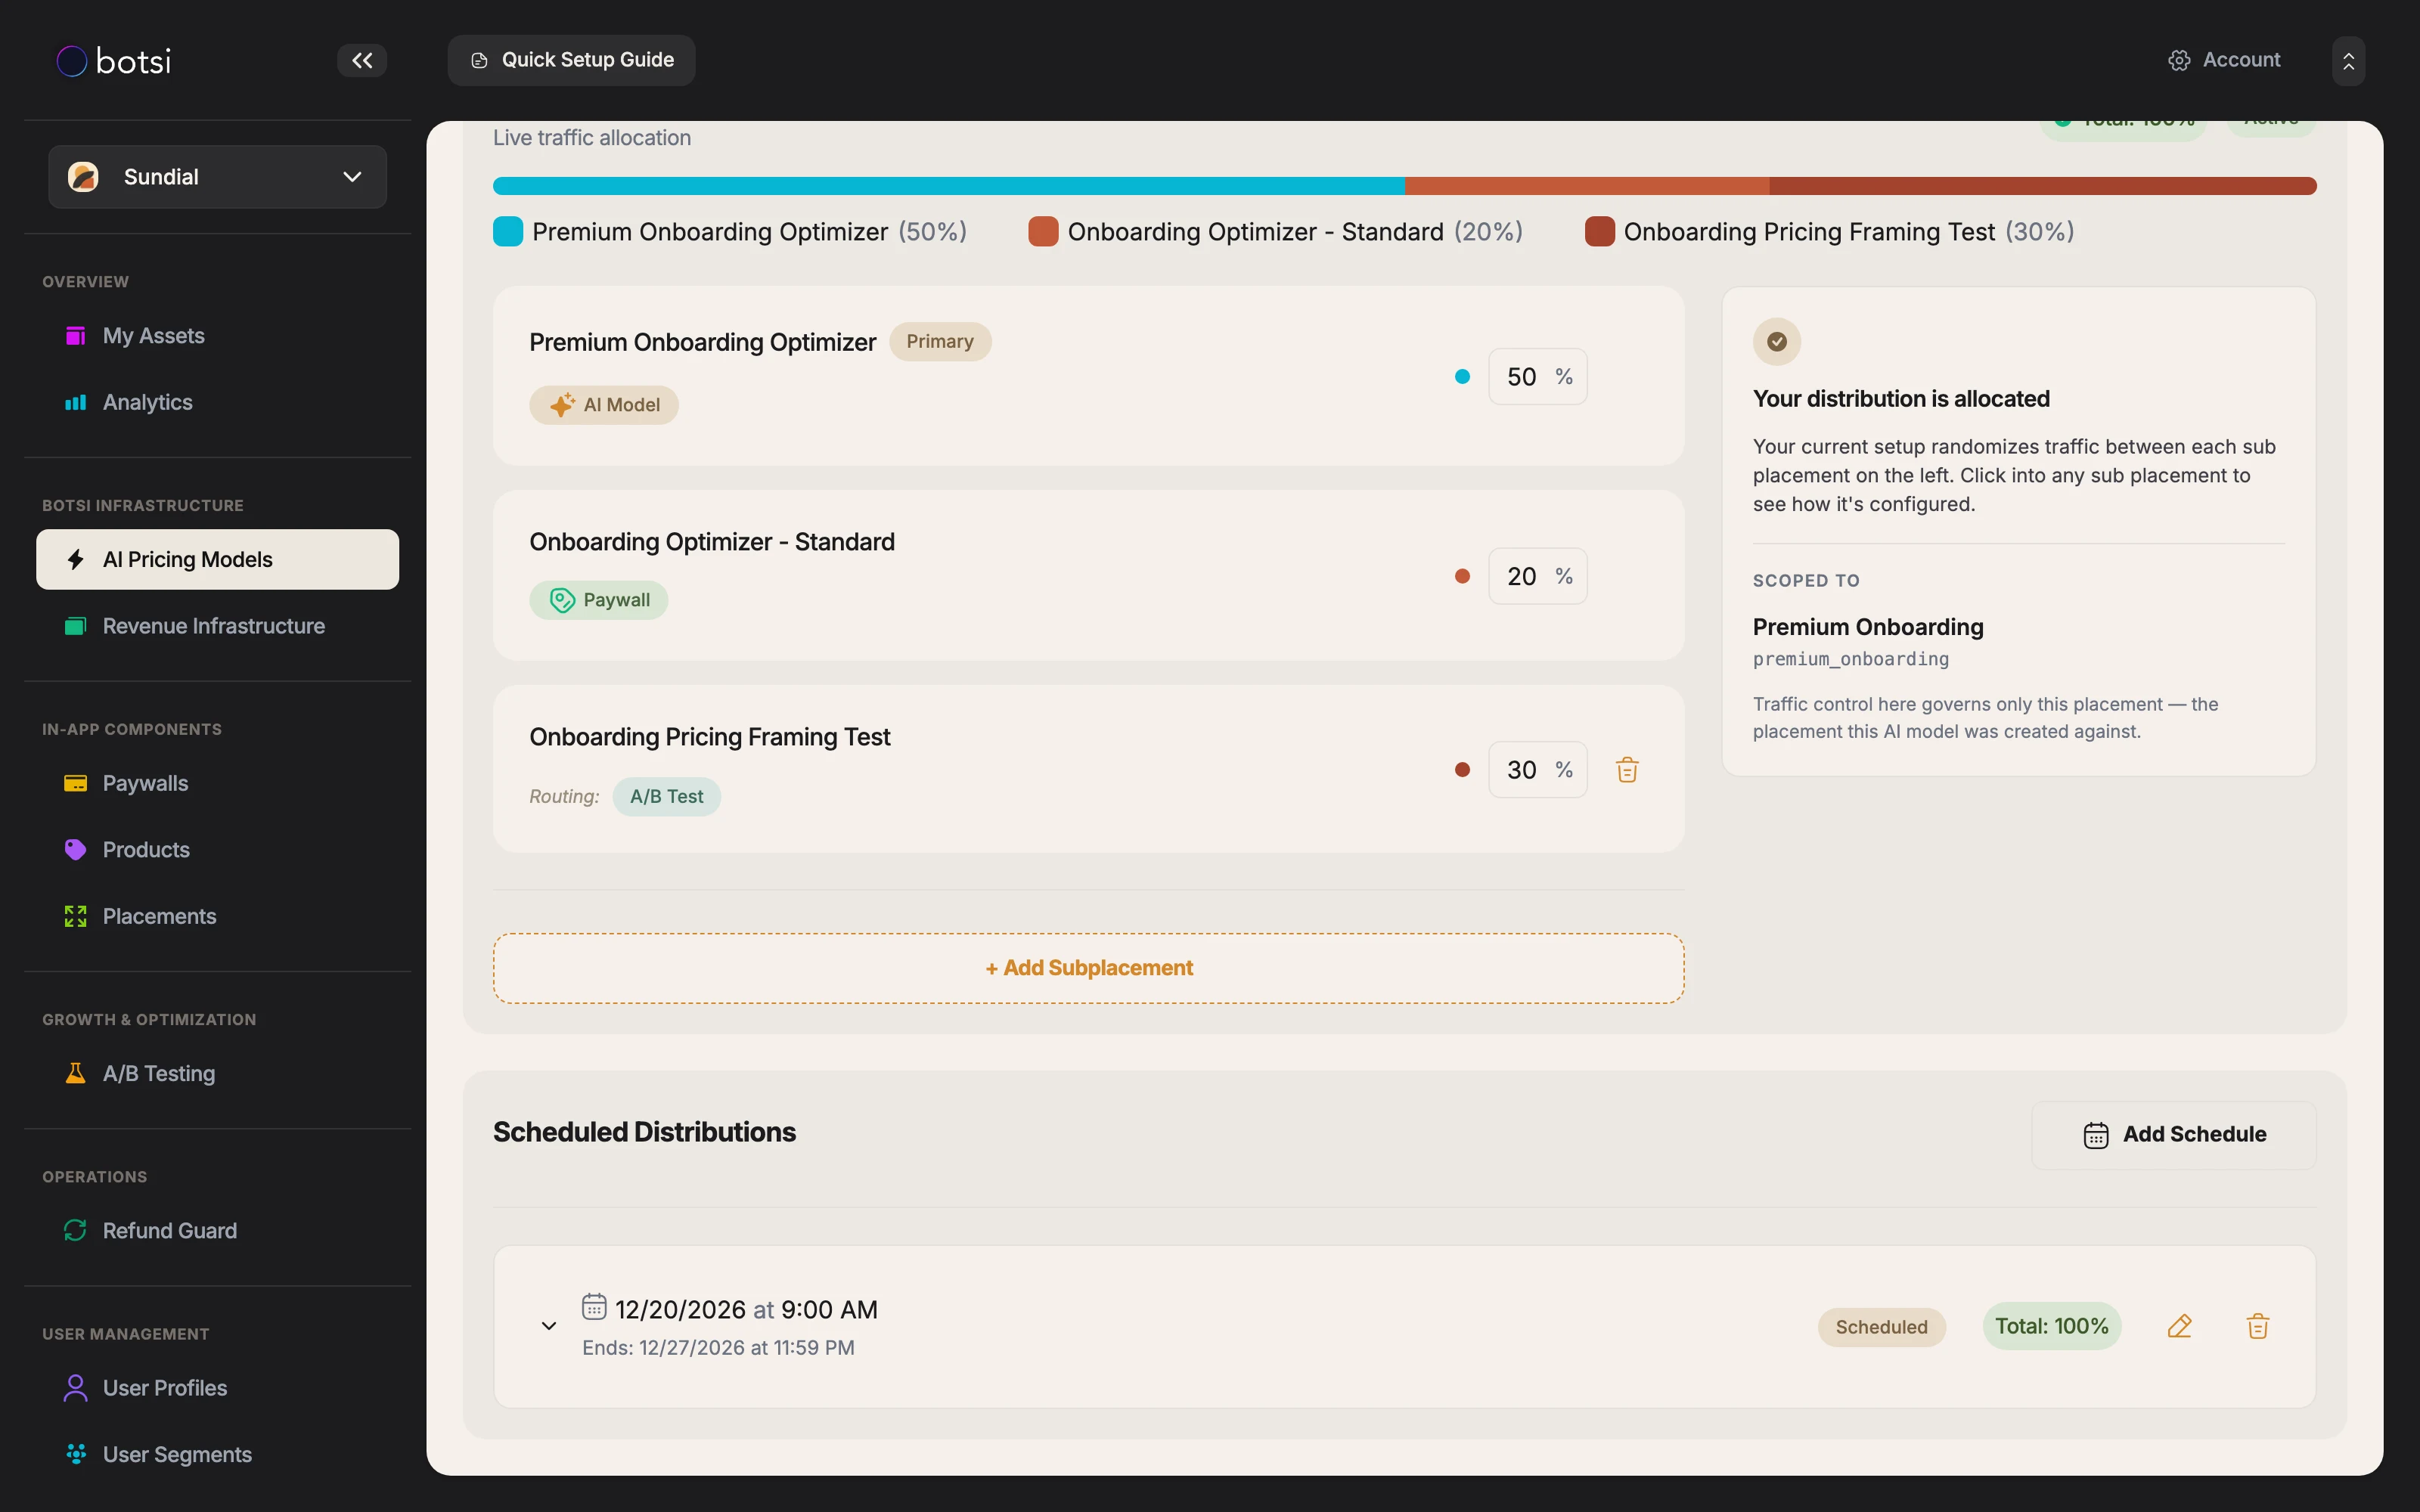
The saved schedule above runs from 12/20/2026 at 9:00 AM to 12/27/2026 at 11:59 PM. Until 9:00 AM on December 20 the model keeps serving its always-on split, and from that moment until the end of the window every request goes to the placement behind the seasonal creative.
A window does not have to be a full takeover. Select more than one placement in step 1 and give each its own weight in step 2, so a window can run 70% on the sale creative and 30% somewhere else. The only rule is that the weights total exactly 100.
What happens when the window opens and closes
-
The start time is inclusive, the end time is exclusive. The schedule is serving from the start instant, and the instant the end time arrives it is not.
-
A running schedule fully replaces the always-on distribution. Nothing is blended and the always-on weights are ignored for the duration. On screen, the always-on section is retitled Default Distribution and marked Paused, and the running schedule becomes the Current Distribution. Paused there only means a schedule is currently overriding it.
-
Reversion is automatic. At the end time, traffic returns to the always-on distribution on the very next request. Nothing needs to be clicked, and the schedule row then reads Completed.
-
No background job runs. The active window is worked out per request against the server clock, so a window that has just opened or just closed takes effect immediately. A schedule you confirm with a start time that has already passed starts serving on the next request.
Plan the window around these
-
Set an end date for a fixed window. Set end date is what makes the window close on its own. Left unticked, the schedule is open-ended, and because an open-ended window covers all time after its start, it also blocks every later schedule you try to add. For a seasonal takeover, always tick it.
-
Windows may not overlap. Only one scheduled window may cover any given moment, and a save that would create an overlap is rejected with
Scheduled groups must not overlap. Please ensure each scheduled group has a distinct time range.Because the start is inclusive and the end is exclusive, back-to-back windows work cleanly: set the next window to start exactly when the previous one ends, with no gap and no overlap. -
Dates and times are the browser's local timezone. They are entered and displayed in whatever timezone your browser is in, with no timezone label on screen, and they are stored and compared in UTC. A teammate in another timezone will read the same schedule as a different clock time, so agree on whose clock the window is set to.
-
To end a window early, delete the schedule. There is no pause. Deletion takes effect immediately, with no confirmation prompt, and traffic returns to the always-on distribution on the next request.
-
The window covers this model's traffic. A takeover reaches the users who hit this model's placement and match its audience, not everyone using your app.
Good to know
Reporting does not break a schedule out as its own column. Traffic served through a placement allocation is counted alongside the model's baseline traffic, so to read how a seasonal window performed, look at the paywalls that placement served over the window's dates rather than at a per-arm figure on the model.
Deleting a placement removes any allocation pointing at it, including allocations inside a saved schedule, with no warning. That leaves the schedule totalling less than 100, and the rows that remain are renormalised at serve time, so the effective split stops matching the numbers on screen. If you clean up placements, reopen Traffic Control afterwards and check that each schedule still totals 100.
Saving a schedule does not touch the model's own paywalls or its weight. That write-back happens only when you save the always-on distribution, see Good to know on the Traffic Control overview.
See also
- Traffic Control: the always-on distribution every model runs, and the three allocation targets.
- A/B Tests in Traffic Control: hold back a share of traffic and point it at an A/B test, on a schedule or always on.
- Create Placements: put the seasonal creative behind a placement so a schedule can target it.
- AI Pricing Integration Guide: create the model and set the distribution it launches with.
- A/B Tests Overview: Botsi's placement-level paywall testing, a sibling feature for a different job.